Research Outputs
The My Research Outputs page lists outputs captured by Elements.
Access via the Research Outputs tile from your Elements homepage.
Click one of the following tabs to view output data:
- Summary-basic bibliographic data for the research output.
- Metrics-displays article and journal level metrics for the output.
- Deposits-details of research output file/s in Griffith Research Online.
- Labels-ontologies associated with the research output (2020 FOR codes etc).
- Relationships-other users linked to the research output.
- Sources-data sources for each research output.
- History-log of all activities performed against the record.

Engage with Elements
Research outputs can be manually added if they are not automatically harvested from online databases.
From the Elements homepage select + ADD NEW from the Research Outputs tile.
Select an output type and do one of the following:
- Search for your output by title and if located, claim it.
- Enter the DOI to retrieve details from databases. This pre-populates the manual entry form.
- Click Skip and complete the manual entry form. Click the question marks on the form for guidance about specific fields.
Click save.
Link funding
Select a listed grant > Link Selected > Done. Or use Filters to locate a grant > Link Selected > Done.
For School or Department funded grants click Not externally funded.
If not displaying, select Grant not listed.
Note: external funding with confidentiality requirements may not display.
Deposit research output
Choose a file to upload or Add OA location.
Deposit Without Files if unable to provide a file to create a record in GRO.
Or Skip this step.
To import items from Google Scholar, EndNote etc.:
- Save BibTeX file from Google Scholar or reference manager (EndNote, Mendeley etc).
- Login to Elements and navigate to My Profile > Tools > Import Research Outputs.
- Browse and select the saved BibTeX (.bib) file.
- Upload.
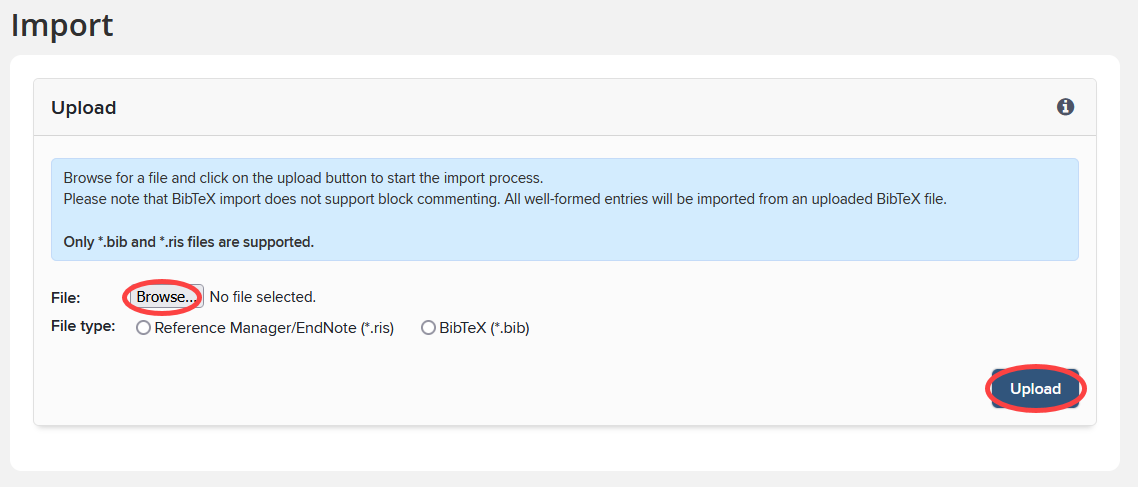
Elements will compare these with your current research outputs (including any declined). A list is generated showing any matches.
Choose one of the following for each:
- Import as new-create a new record based on this data, separate to the existing record.
- Supplement existing-add a manual source to the existing research output record and make this the preferred source.
- Do not import-skip this record in the import file.
When completed, click Import.
Researchers should submit their creative research ouputs directly to the Creative Works repository (Figshare).
Please see the Repository webpage for more guidance.
HDR candidates can add creative outputs manually into Elements.
- From the Elements homepage select + ADD NEW from the Research Outputs tile.
- Select one of the creative output types (Original Creative Work, Curated Public Exhibition/Event, Live Performance of Creative Work or Recorded/Rendered Creative Work)
- Complete the form.
- Click the question marks on the form for guidance about specific fields.
- Click Additional information to add further details.
- Click Save.
Link funding to existing record
Link grants and funding to your research outputs.
- Select the title from the Research Outputs list.
- Scroll down to Links.
- Select Create links > Grant.
- Select a listed grant > Link Selected > Done. Or use Filters to locate a grant > Link Selected > Done.
- For School or Department funded grants click Not externally funded.
- If not displaying, select Grant not listed.
Note: external funding with confidentiality requirements may not display.

Deposit to GRO from an existing record
Make an output discoverable by depositing to Griffith Research Online (GRO).
GRO is available to all researchers:
- Delivers free online, full-text versions of research outputs, where this is possible, with the appropriate permissions of copyright owners.
- Ensures your research outputs are visible, discoverable, and accessible via search engines like Google and discovery services such as the National Library's Trove.
- Go to Menu > Open Access > Research outputs awaiting deposit
- Click Deposit.

- Choose a File/s to upload or Add OA location, select a licence if appropriate.
- Deposit Without Files if unable to provide a file to create a record in GRO, or Leave without depositing.
- The GRO Team will process and make the output discoverable.
All fields in manually added outputs can be edited.
For outputs harvested from databases the following can be edited:
- Output type (journal article, book chapter).
- Labels (Field of Research, Socio-Economic Objectives).
- Links (co-authors and grants).
To edit an output:
- Click the research output.
- A pencil icon indicates fields that can be updated.
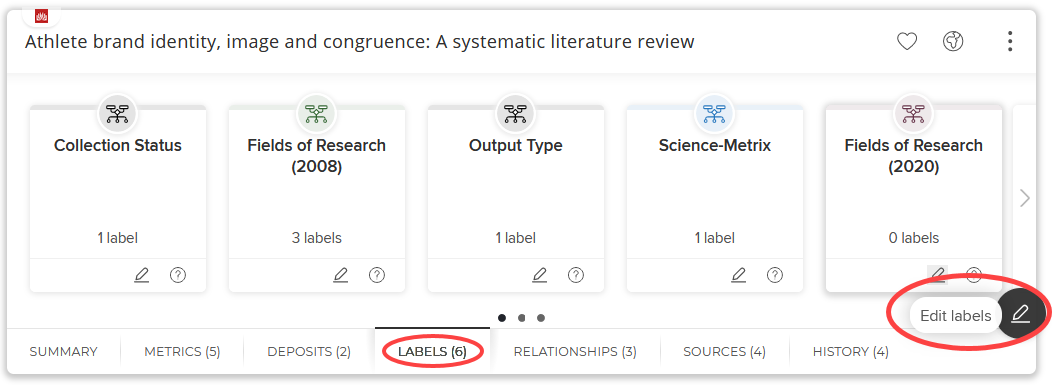
Labels are a way to categorise and manage research outputs and include schemas such as 2020 FOR codes, Science-Metrix and MeSH ontologies.
Each research output contains a labels tab featuring available schemas and the number of labels applied to each.
Click the Edit Labels icon to add or remove labels or set percentages where permitted.
2020 FOR codes
Check your outputs to ensure the correct 2020 FOR codes are displayed.
- In Elements, click on the Research Outputs tile.
- Change ‘focus on’ from summary to labels.
- Navigate to the Fields of Research (2020) tile.
- Click the pencil icon (Edit labels) to check FoR codes.
- To add a code, type a word or FOR code.
- Select a code and Add.
- Save Changes.
This short video demonstrates the steps above.
- Go to: Menu > My Profile > ORCID settings.
- If your ORCID isn't connected with Elements, choose Register or connect ORCID.
- If your ORCID is connected to Elements, click Revoke authorisation.
- Reconnect your ORCID ID (will need ORCID login and password).

- Select Read and write publication data to my OCRID account.
- Save
Require Support or Questions?
Need Help?
All support requests are managed by Griffith Library in partnership with the Office for Research and Digital Solutions.
Research Outputs
The My Research Outputs page lists outputs captured by Elements.
Access via the Research Outputs tile from your Elements homepage.
Click one of the following tabs to view output data:
- Summary-basic bibliographic data for the research output.
- Metrics-displays article and journal level metrics for the output.
- Deposits-details of research output file/s in Griffith Research Online.
- Labels-ontologies associated with the research output (2020 FOR codes etc).
- Relationships-other users linked to the research output.
- Sources-data sources for each research output.
- History-log of all activities performed against the record.

Engage with Elements
Research outputs can be manually added if they are not automatically harvested from online databases.
From the Elements homepage select + ADD NEW from the Research Outputs tile.
Select an output type and do one of the following:
- Search for your output by title and if located, claim it.
- Enter the DOI to retrieve details from databases. This pre-populates the manual entry form.
- Click Skip and complete the manual entry form. Click the question marks on the form for guidance about specific fields.
Click save.
Link funding
Select a listed grant > Link Selected > Done. Or use Filters to locate a grant > Link Selected > Done.
For School or Department funded grants click Not externally funded.
If not displaying, select Grant not listed.
Note: external funding with confidentiality requirements may not display.
Deposit research output
Choose a file to upload or Add OA location.
Deposit Without Files if unable to provide a file to create a record in GRO.
Or Skip this step.
To import items from Google Scholar, EndNote etc.:
- Save BibTeX file from Google Scholar or reference manager (EndNote, Mendeley etc).
- Login to Elements and navigate to My Profile > Tools > Import Research Outputs.
- Browse and select the saved BibTeX (.bib) file.
- Upload.

Elements will compare these with your current research outputs (including any declined). A list is generated showing any matches.
Choose one of the following for each:
- Import as new-create a new record based on this data, separate to the existing record.
- Supplement existing-add a manual source to the existing research output record and make this the preferred source.
- Do not import-skip this record in the import file.
When completed, click Import.
Researchers should submit their creative research ouputs directly to the Creative Works repository (Figshare).
Please see the Repository webpage for more guidance.
HDR candidates can add creative outputs manually into Elements.
- From the Elements homepage select + ADD NEW from the Research Outputs tile.
- Select one of the creative output types (Original Creative Work, Curated Public Exhibition/Event, Live Performance of Creative Work or Recorded/Rendered Creative Work)
- Complete the form.
- Click the question marks on the form for guidance about specific fields.
- Click Additional information to add further details.
- Click Save.
Link funding to existing record
Link grants and funding to your research outputs.
- Select the title from the Research Outputs list.
- Scroll down to Links.
- Select Create links > Grant.
- Select a listed grant > Link Selected > Done. Or use Filters to locate a grant > Link Selected > Done.
- For School or Department funded grants click Not externally funded.
- If not displaying, select Grant not listed.
Note: external funding with confidentiality requirements may not display.

Deposit to GRO from an existing record
Make an output discoverable by depositing to Griffith Research Online (GRO).
GRO is available to all researchers:
- Delivers free online, full-text versions of research outputs, where this is possible, with the appropriate permissions of copyright owners.
- Ensures your research outputs are visible, discoverable, and accessible via search engines like Google and discovery services such as the National Library's Trove.
- Go to Menu > Open Access > Research outputs awaiting deposit
- Click Deposit.

- Choose a File/s to upload or Add OA location, select a licence if appropriate.
- Deposit Without Files if unable to provide a file to create a record in GRO, or Leave without depositing.
- The GRO Team will process and make the output discoverable.
All fields in manually added outputs can be edited.
For outputs harvested from databases the following can be edited:
- Output type (journal article, book chapter).
- Labels (Field of Research, Socio-Economic Objectives).
- Links (co-authors and grants).
To edit an output:
- Click the research output.
- A pencil icon indicates fields that can be updated.
Labels are a way to categorise and manage research outputs and include schemas such as 2020 FOR codes, Science-Metrix and MeSH ontologies.
Each research output contains a labels tab featuring available schemas and the number of labels applied to each.
Click the Edit Labels icon to add or remove labels or set percentages where permitted.
2020 FOR codes
Check your outputs to ensure the correct 2020 FOR codes are displayed.
- In Elements, click on the Research Outputs tile.
- Change ‘focus on’ from summary to labels.
- Navigate to the Fields of Research (2020) tile.
- Click the pencil icon (Edit labels) to check FoR codes.
- To add a code, type a word or FOR code.
- Select a code and Add.
- Save Changes.
This short video demonstrates the steps above.

- Go to: Menu > My Profile > ORCID settings.
- If your ORCID isn't connected with Elements, choose Register or connect ORCID.
- If your ORCID is connected to Elements, click Revoke authorisation.
- Reconnect your ORCID ID (will need ORCID login and password).

- Select Read and write publication data to my OCRID account.
- Save
Require Support or Questions?
Need Help?
All support requests are managed by Griffith Library in partnership with the Office for Research and Digital Solutions.
Claim/reject research outputs
Sometimes you will be prompted to claim or reject research outputs.
These will be placed in the Pending list for your approval.
An action in your My Actions list will also take you to pending outputs:

Claim or reject research outputs using the tick or cross buttons:
- Claimed outputs will move to the Claimed list
- Rejected to the Rejected list.
If there are many outputs that do not belong to you, and it is not clear for you why, contact Elements Support and the support team will help with:
- clearing the Pending list
- modifying search settings to improve accuracy of the searches
- re-running your search.
Elements allows you to "claim" research outputs automatically, reducing the time and effort you would otherwise spend managing research output information.
Settings for auto-claiming are based on name, email addresses and/or matches in researcher identifier systems (e.g. ORCID, ScopusID etc.).
Research outputs claimed automatically will appear in your Research Outputs list.
Steps to set up “auto-claiming” only need to be performed once. Elements will automatically claim your research outputs from that point forward.
- Login to Elements
- Select Menu > My Profile > Settings > Automatic Claiming
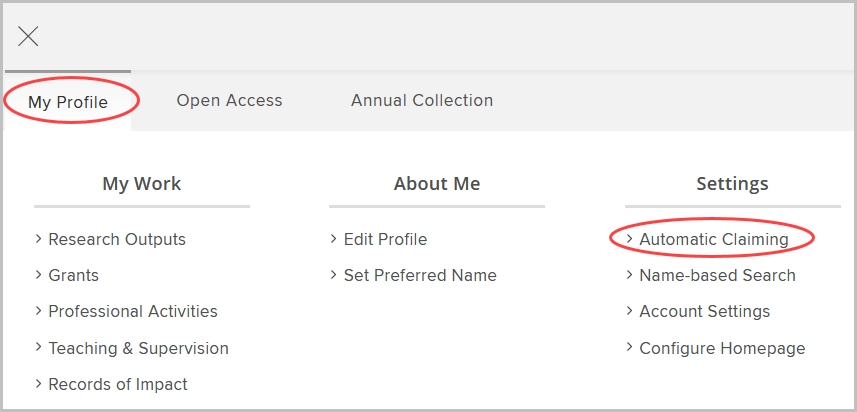
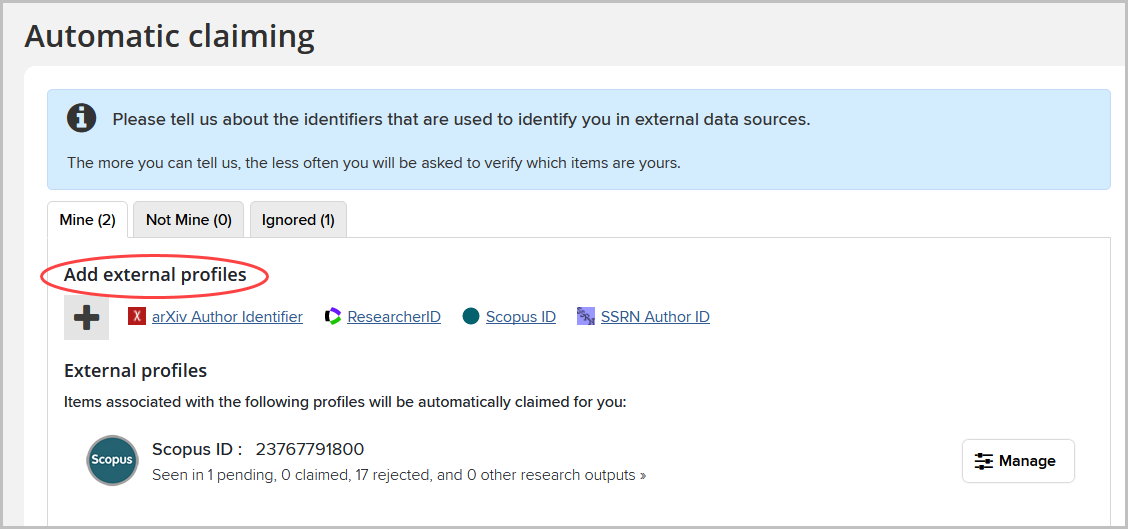
Elements uses a range of researcher identifiers (arXiv, Dimensions, ORCID, Web of Science ResearcherID, Scopus ID, SSRN Author ID) to facilitate the claiming of research output data.
- On the Automatic claiming page, there may be a list of data sources under the "Do these identify you?" section.
Elements locates identifiers from data sources based on search settings in the system.
- Approve or reject the identifiers using the Yes or No buttons.
Elements will automatically claim all research outputs which feature that identifier and continue to do so in the future.
- If the system does not find all your identifiers, you can enter them by clicking on the “Add...” link.
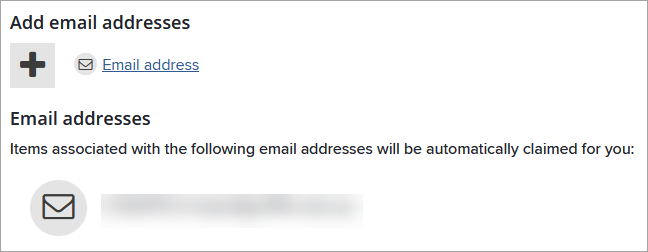
Email addresses can also be used to autoclaim research outputs.
Your Griffth email address is automatically added to the autoclaiming system. Additional addresses can be entered (e.g. other institution’s email address).
Click the hypertext link under Add email addresses to enter another email address.
Name-based search settings are preloaded with your name (usually in the form of LASTNAME, INITIAL and LASTNAME, FIRSTNAME).
Improve these settings by adding name variants or address terms.
This is recommended if you:
- Have a lot of research outputs pending that are not yours.
- Published under a previous name.
- Have a common name.
- Select Menu > My Profile > Settings Name-based Search
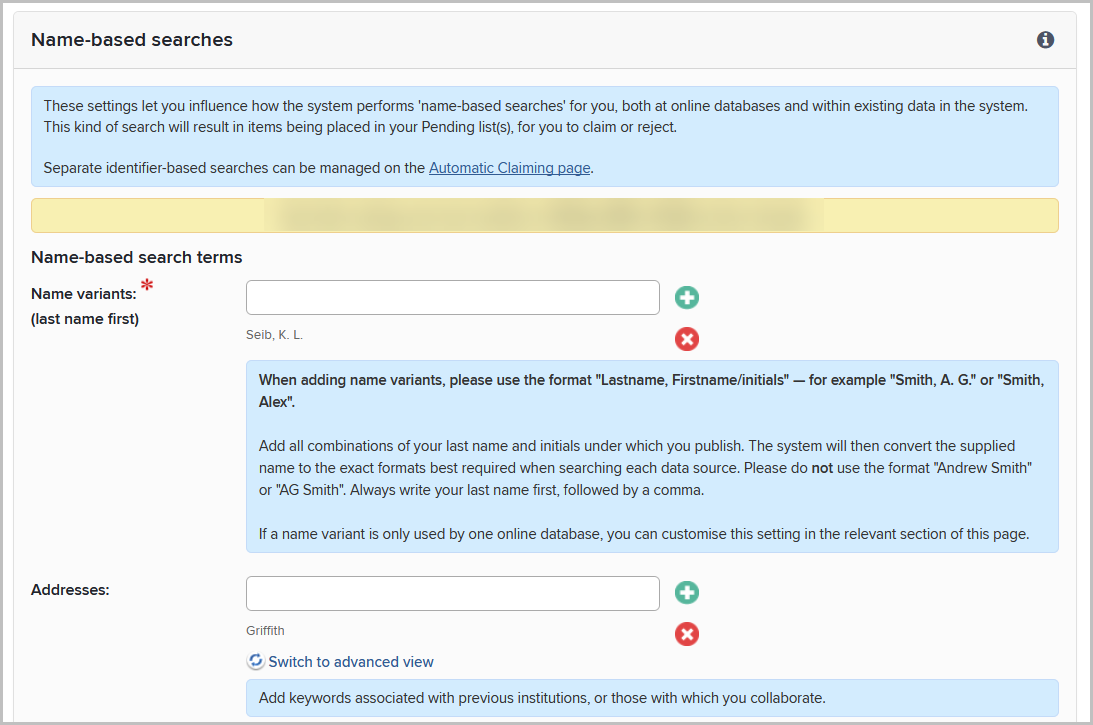
- For addresses, simply use the official name of the institution
- Click "Save" when finished
Claim/reject research outputs
Sometimes you will be prompted to claim or reject research outputs.
These will be placed in the Pending list for your approval.
An action in your My Actions list will also take you to pending outputs:

Claim or reject research outputs using the tick or cross buttons:
- Claimed outputs will move to the Claimed list
- Rejected to the Rejected list.
If there are many outputs that do not belong to you, and it is not clear for you why, contact Elements Support and the support team will help with:
- clearing the Pending list
- modifying search settings to improve accuracy of the searches
- re-running your search.
Elements allows you to "claim" research outputs automatically, reducing the time and effort you would otherwise spend managing research output information.
Settings for auto-claiming are based on name, email addresses and/or matches in researcher identifier systems (e.g. ORCID, ScopusID etc.).
Research outputs claimed automatically will appear in your Research Outputs list.
Steps to set up “auto-claiming” only need to be performed once. Elements will automatically claim your research outputs from that point forward.
- Login to Elements
- Select Menu > My Profile > Settings > Automatic Claiming

Elements uses a range of researcher identifiers (arXiv, Dimensions, ORCID, Web of Science ResearcherID, Scopus ID, SSRN Author ID) to facilitate the claiming of research output data.
- On the Automatic claiming page, there may be a list of data sources under the "Do these identify you?" section.
Elements locates identifiers from data sources based on search settings in the system.
- Approve or reject the identifiers using the Yes or No buttons.
Elements will automatically claim all research outputs which feature that identifier and continue to do so in the future.
- If the system does not find all your identifiers, you can enter them by clicking on the “Add...” link.

Email addresses can also be used to autoclaim research outputs.
Your Griffth email address is automatically added to the autoclaiming system. Additional addresses can be entered (e.g. other institution’s email address).
Click the hypertext link under Add email addresses to enter another email address.

Name-based search settings are preloaded with your name (usually in the form of LASTNAME, INITIAL and LASTNAME, FIRSTNAME).
Improve these settings by adding name variants or address terms.
This is recommended if you:
- Have a lot of research outputs pending that are not yours.
- Published under a previous name.
- Have a common name.
- Select Menu > My Profile > Settings Name-based Search

- For addresses, simply use the official name of the institution
- Click "Save" when finished
